Step by step guide to explain the causes and process to fix loose shower tiles.

What causes drummy tiles?
The tile adhesive has failed and is no longer bonding the tile to the wall.
This can be caused by using the incorrect adhesive, incorrect preparation, not applying enough adhesive initially, structural movement or moisture underneath the tiles. The sound is an indicator of the failed adhesion.
Table of Contents
If you delay repairing loose tiles
Water can get in behind them and cause further damage to the shower wall.
In an old shower, you might find that the wall sheets weren’t waterproofed prior to the original tiling. If the sheets get saturated, they’ll cause water problems in the timberwork and the ceiling below.
If the shower is on ground level, it’s important to note that water encourages termites (also known as white ants). Once termites infest the area they won’t stop at the shower. If left unchecked, termites can infiltrate other parts of the house. This means the whole shower will need to be replaced and that’s a significant expense.
Important
Don’t attempt any DIY projects if cement sheeting behind the tiles contains asbestos. This material, often found in homes built before the 1980s can pose serious health risks. If you suspect asbestos, have the area inspected by an asbestos removal company. Call in licensed professionals and have the product safely removed from your property.
We recommend products based on our experience and the benefit to our DIY community. If you use our links to make a purchase, we may earn a commission which is no additional cost to you. Read our disclosure policy here
Tools & Materials
How to
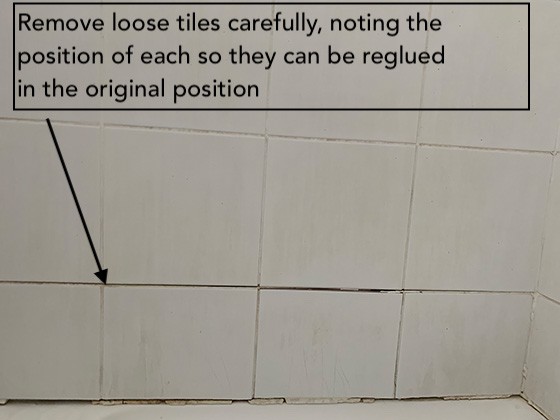
Step 1 – Remove tiles
Take your time with this part of the job to avoid damaging tiles as you’re removing them.
If a tile is damaged you’ll have to chase around tiling stores to find a tile to match. And finding a perfect match for a damaged tile can be challenging. Even the closest match will be noticeable.
- Tube of Sikaflex - (or other polyurethane adhesive)
- Sikalex gun (or applicator)
- Grouting float
- Grout mix
- Large sponge, about the size of a brick
- Small metal scraper - to remove old glue
- Container to mix grout into
- Bucket of water
- Grout sealant spray
- Spray bottle with detergent and water
- Soft polishing cloth
Marty's Tip
Carefully remove old tiles and note the original position of each one. They will be reglued in the same positions.
I label (or number) the back of the tiles as I remove them to ensure I can attach them back in their original positions.
Step 2
Use a scraper to removed excess grout from the wall.
Be careful not to damage the wall by poking a hole through the villaboard. Any hole has to be patched and waterproofed before replacing the tiles.
Step 3
Scrape off all old tile glue from behind the tiles using a small metal scraper.
Step 4
Using Sikaflex (or a similiar polyurethane product) and an applicator, place blobs (the size of a large coin) evenly spaced along the back of tile covering much of the tile surface area.
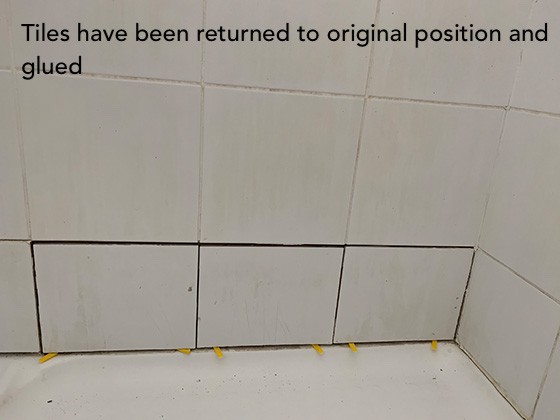
Step 5
Reinstall the tiles by firmly pressing them back into their original positions on the wall.
Step 6 – Grouting
Prepare the grout according to the manufacturer’s instructions (typically fround on the back of the packet). Aim for a consistency similar to toothpaste for easy application and quick drying.
Using a grouting float push the grout into the newly formed tile joins.
Step 7
Place the sponge into a bucket of clean water and wring it out until it’s just damp. (Avoid making it too wet as you don’t want to wash away the grout between the tiles.)
Start smoothing the sponge over the tiles to remove excess grout from the surface of the tiles.
Step 8
Leave the grout to dry for 24 hours (or the time specified by the manufacturer).
Step 9
In a spray bottle mix detergent (approx 1 tablespoon) with water and shake the bottle to thoroughly mix. Spray on to the tiles that have been replaced.
Applying the detergent mix to the area helps clean the grout residue on the tile surface more effectively than using water alone.
Use a soft polishing cloth to remove excess dust and polish. Allow area to dry.
Step 10 – Apply Sealant
Read grout sealant instructions thoroughly.
Ensure the area is well ventilated when using the product. Turn on an extractor fan, open windows and wear a mask as the spray can be harmful to inhale.
Apply the sealant spray using a sweeping motion, just along the grout lines. Spray evenly and cover every join in the grout.
Step 11
Wait 24 hours before using the shower.
Congratulations! You’ve successfully completed another job, saved yourself the hassle of getting a professional in, and saved money in the process.