It’s easy to patch a hole in drywall (or plasterboard for our Australian and NZ readers). I’ll show you what you need to patch the hole, guide you through step by step, and share my tradesman tips. There’s no need to outsource this kind of job, you can achieve a great result and save yourself $$$ on your reno.

We recommend products based on our experience and benefit to our DIY community. If you use our links to make a purchase, we may earn a commission which is no additional cost to you. Read our disclosure policy here
Tools & Materials
- Plasterboard
- Stanley knife
- Gyrock saw
- 2 pieces of soft pine
- Drill with philips head screw attachment
- Plasterboard screws
- Drop sheet to protect floor
- Fiberglass tape
- Premixed plaster
- 2 x plaster trowels
- Small trowel
- Fine sponge sanding block
- Primer sealer undercoat
- Low sheen acrylic wall paint
- Acrylic wall paint roller
- Paint roller and roller tray
- Paint brush
Trade Tips
- It’s a good idea to cut the existing hole into a geometric shape. This makes the job so much quicker and easier than trying to match the hole with a piece of plasterboard.
- Fiberglass join tape reinforces the plaster and ensures that cracks don’t form on the joins once you have finished plastering.
The How To
Step 1
Safety first: Check to make sure there are no electrical wires or plumbing in the wall where you’re working.
Lay out your drop sheet to protect the floor and break away loose edges of plaster from around the hole.
Step 2
Cut a piece of plasterboard, slightly bigger than the hole, in a geometric shape. This gives you a template to cut out and your piece of plasterboard will fit neatly into that hole.
Step 3
Place the piece of plasterboard over the hole and trace around the outside edge with your stanley knife, with just enough pressure to mark the wall. This mark be your guide for cutting out.
Step 4
Using a plasterboard saw, cut along the traced edge you’ve drawn.
.
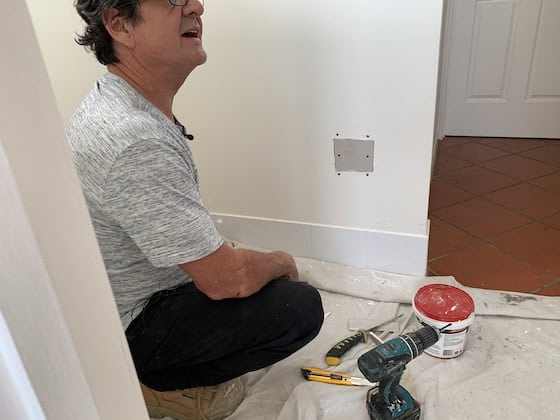
Step 5
Next you’ll be securing 2 pieces of pine firmly to the inside surface of the plasterboard. To achieve this, use a drill with a philips head bit to screw through the plasterboard into the pine in 2 places on each side, at the top and bottom.
Take one of the pieces of pine and hold it firmly on the inside of the plasterboard.
Using your drill with a philips head bit, screw through the plasterboard and into the pine until the pine pulls up tightly behind the plasterboard. There’s no need to push the drill, it’s important to let the drill do the work.
Make sure the screws are countersunk into the plasterboard so when you run your hand over the area you don’t feel the head of the metal screw.
Repeat this process on the other side of the hole so the 2 pieces of pine are firmly attached at the top and bottom on the inside of the wall.
Now you have a firm backing to hold your piece of plasterboard in place.
Step 6
Place the cut piece of plasterboard into the hole you’ve prepared. It should fit perfectly.
Secure the plasterboard into place by using your drill to screw through the plasterboard into the pine each side. Make sure screws are countersunk into plasterboard.
Step 7
Apply Fibreglass joining tape. This product has a sticky side. Cut 2 lengths, 1 for the top and 1 for the bottom and ensure the join is positioned in the center of the tape. Stick tape to wall.
Cut 2 pieces for the sides, position and stick. This tape reinforces the area and prevents cracking.
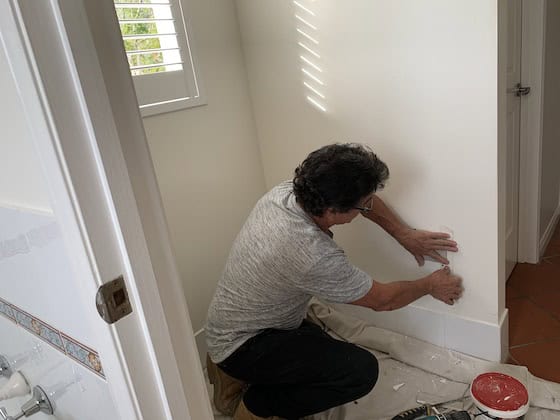
Step 8
Apply pre mixed plaster over the area using plaster scrapers.
Use smooth stokes. Apply in a downward motion and then a crossways motion and repeat. Leave this to dry for 24 hours.
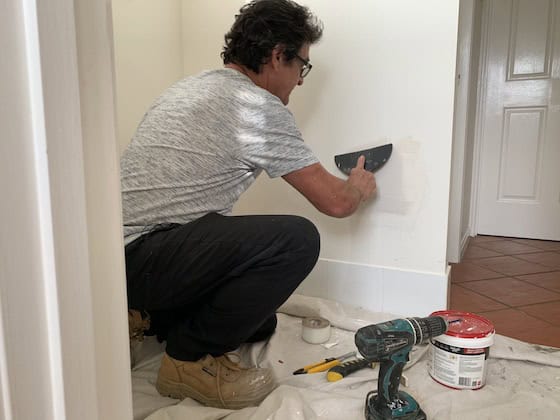
Step 9
Using a small metal trowel gently remove any small imperfections.
Step 10
Repeat steps 8 and 9 twice more.
Step 11
Taking the fine sponge sanding block and using circular motions smooth the area of any imperfections. Don’t press too hard.
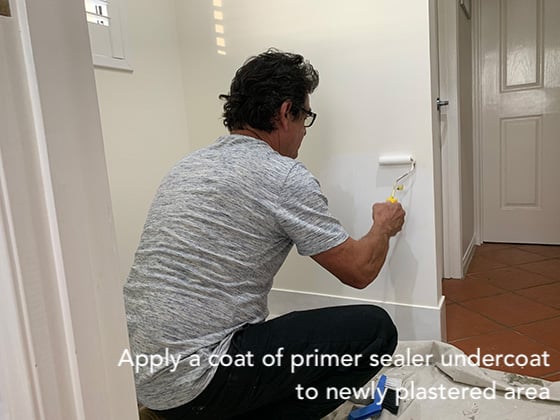
Step 12
Using a small paint roller apply a coat of primer sealer undercoat just to the newly plastered area. Let dry for 2 hours.
Note: Check paint manufacturer guidelines for product drying time in case it varies.
Take paint roller and tray outside onto the grass. And use a garden hose to wash tray and clean the roller with water. Don’t wash out in a sink. Think of the environment.
Step 13
Paint wall with 2 coats of low sheen acrylic wall paint.
Take your paint roller and apply the first coat of low sheen wall paint. Allow to dry. Check manufacturer guidelines for recommended drying time.
Repeat for second coat.
If you have the original paint you may be able to just paint the patched area with 2 coats. Otherwise you’ll need to paint the whole wall so that the patch isn’t obvious.
Tips
If you don’t have the paint color, grab a piece of the plasterboard from the original hole, with the color on it, and take it to your paint store. They will color match for you.
How to store paint roller and brushes between coats
Place paint roller, tray and brushes in a plastic bag and tie at the top. This stops brushes and rollers from drying out. When you’re ready to apply the next coat, simply remove from the bag and get started.
When you’ve finishing the final coat, take the roller, brushes, and paint tray outside and wash thoroughly on the grass with plenty of clean water. Hose off the grassed area well. Don’t wash paint down the sink, it’s not good for the environment.
That’s a job well done!